LibreNMS is a fantastic and FREE network monitoring tool that can be extremely useful. Whether you’re a home user who wants to monitor their small network or an enterprise user tracking connectivity between multiple datacenters LibreNMS is a tool that can track all of the metrics you’d like and provide real-time intelligence to make sure everything is working perfectly.
But how exactly are you going to run this new tool? The good news is that if you’ve got about $60 and a few hours to tinker you can get it up and running on a Raspberry Pi 3 B+.
Limitations and Performance
Before we dig much deeper I want to take a moment to talk through the limitations. A Raspberry Pi is an amazing piece of equipment for the price, but it isn’t the fastest thing on the market. Getting LibreNMS up and running is certainly possible, but should you?
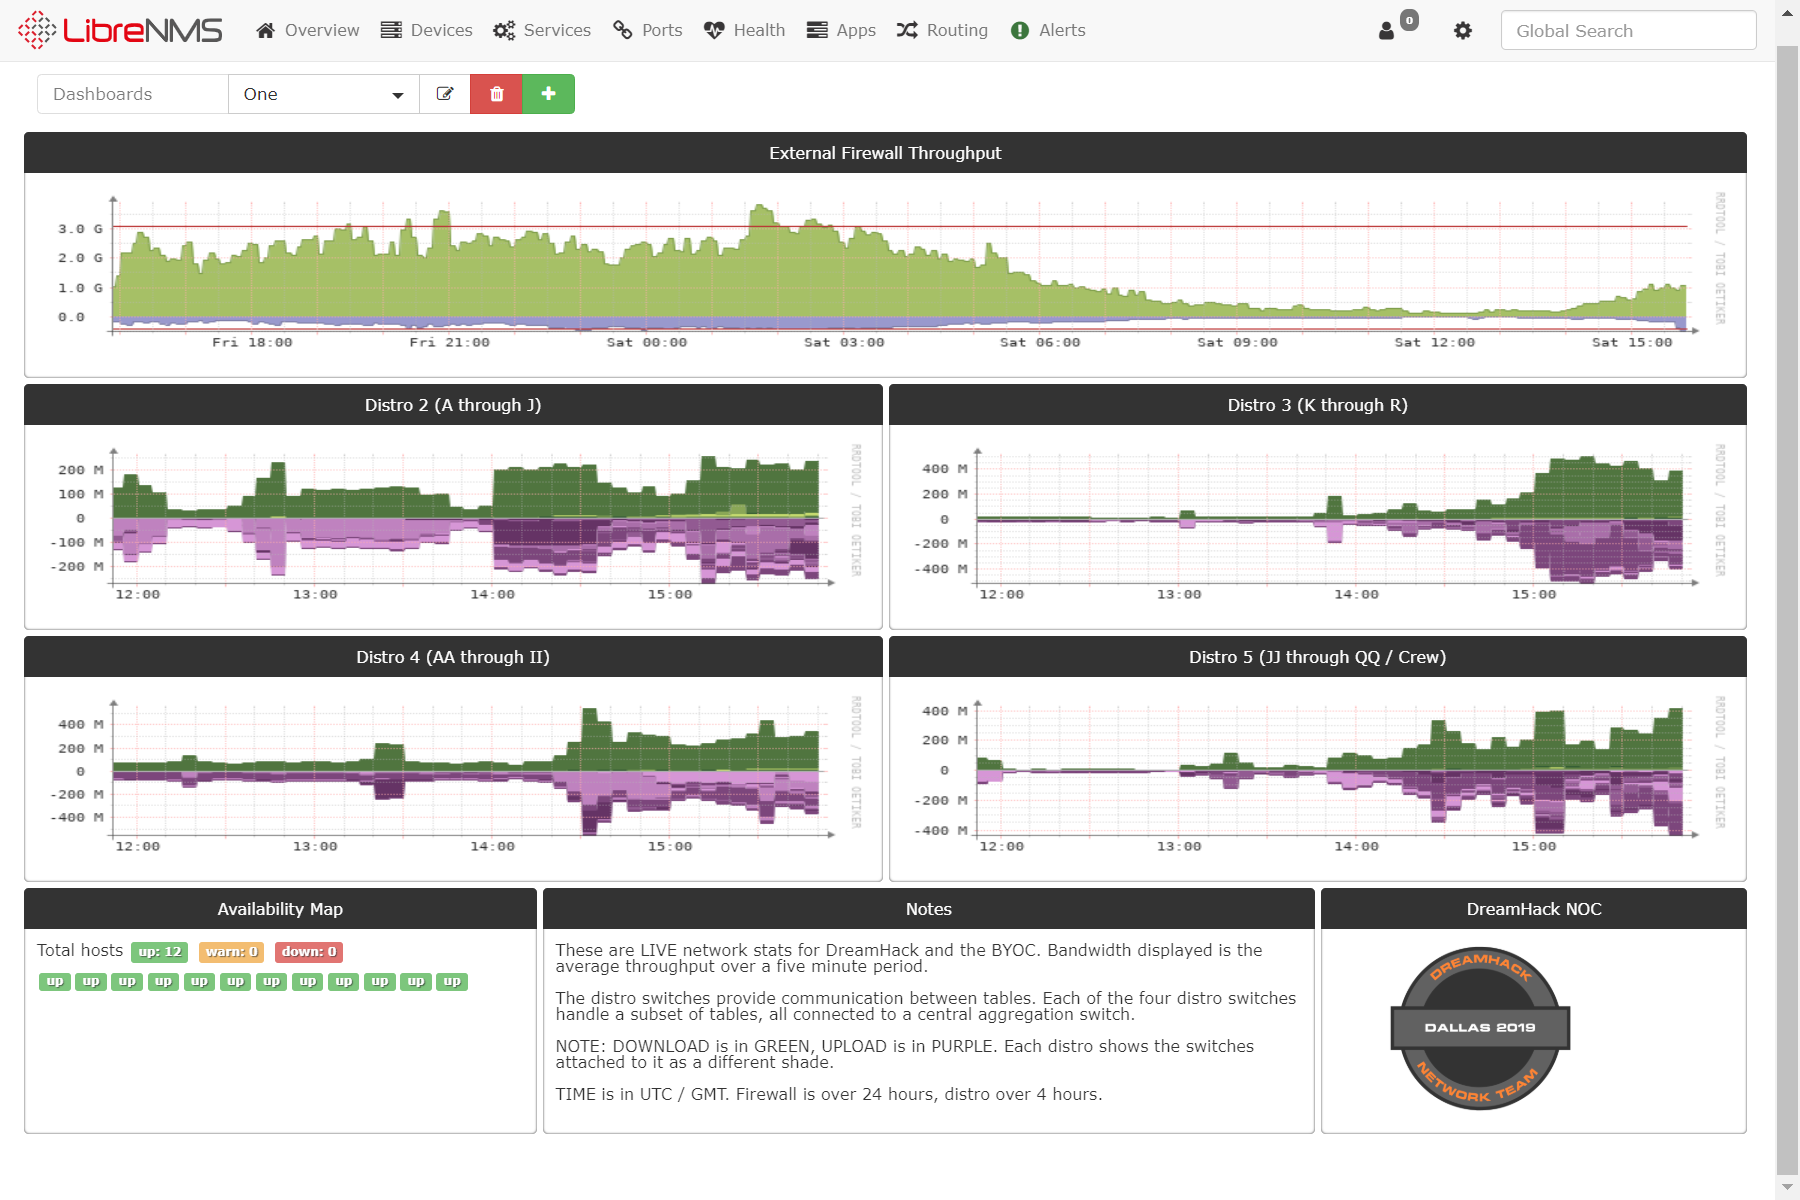
I’ve run LibreNMS in my home for a few years now, and I used it to monitor the sprawling and high-traffic network for Dreamhack Dallas in 2019 (on a Raspberry Pi, no less, which is where the lead image came from). And from that experience I can say with confidence that the device is perfectly happy if you have less than five devices, and as long as those aren’t super chunky switches. If you’re monitoring a couple servers you should be good, but anything more and you might want to consider a docker container or a VM on some other existing piece of kit.
That said, if this is all you have this is a damn fine start.
We assume in this guide that you already have a Raspberry Pi 3 B+ and have assembled it according to the instructions.
Install the Operating System
The operating system for the device is installed onto the SD card that you purchased, and the device runs it from there. There’s no way to run a live image like in other system installations, you actually flash the image straight onto the drive (card).
You can download the latest version of the operating system from this link here. Grab the “Raspbian Stretch with desktop and recommended software” version to make things easy on yourself.
Once you have the image downloaded extract the ISO and write it to the disk. I use Win32 Disk Imager for my imaging needs, it’s good not only for writing images to disks but it can also read and store a copy of the image for you as well. So once you have your Pi running the way you like you can take an image of the disk and save it to easily recover in the future.
Once the image is written install the card in the Pi and power it on, connecting a mouse, keyboard, monitor (via DVI) and network cable. Once booted the system will guide you through the initial configuration and update process visually on screen.
Once complete (and rebooted at least once probably) you’ll want to make some changes to make it easier to continue the configuration process and manage the device in the future. Navigate to the Raspberry icon in the top left corner, click Preferences, then Raspberry Pi Configuration.
- Set the hostname. This will enable you to SSH and connect to the device without needing to know the IP address.
- On the interfaces tab, enable SSH so you can log in remotely.
At this point I swapped to configuring the device via an SSH connection, but you can absolutely continue to configure the device through the monitor.
Install the Necessary Packages
In general, this is a good guide to follow to configure the device from here. But there’s a catch that took me nearly a day to work through.
The biggest problem right now is that the latest version of LibreNMS is designed to run on PHP version 7.1+, but the latest Raspberry Pi distribution still uses PHP version 7.0. This will cause the compose command to fail and will keep you from finishing the configuration.
To get the necessary packages we need to swap to the beta channel for packages and grab the ones we need. To do that, open up the APT sources:
sudo nano /etc/apt/sources.list
Swap “stretch” to “buster” in the deb command. Your line should look something like this when finished:
deb http://raspbian.raspberrypi.org/raspbian/ buster main contrib non-free rpi
Now, take a moment to pull down the updated version of your existing packages before moving forward.
sudo apt update && sudo apt upgrade
I’d highly recommend a reboot at this point. Once you’re back start installing the LAMP stack packages (Linux Apache MySQL PHP).
apt install acl apache2 composer fping git graphviz imagemagick libapache2-mod-php7.0 mariadb-client mariadb-server mtr-tiny nmap php7.1-cli php7.1-curl php7.1-gd php7.1-json php7.1-mbstring php7.1-mcrypt php7.1-mysql php7.1-snmp php7.1-xml php7.1-zip python-memcache python-mysqldb rrdtool snmp snmpd whois
Once that finishes you should have a running MySQL server (using the MariaDB engine) and an Apache server. You should now be able to see the Apache test page on port 80 of your system.
Install LibreNMS
First things first let’s set up the LibreNMS user and group. Note that the default installation location for LibreNMS is in the /opt/librenms folder, not the familiar /var/www/html that you’d expect. We will update the Apache configuration to match this shortly.
useradd librenms -d /opt/librenms -M -r
usermod -a -G librenms www-data
Now let’s actually grab the LibreNMS source code and get the dependencies.
cd /opt
composer create-project --no-dev --keep-vcs librenms/librenms librenms dev-master
NOTE: this will take some time. You might want to run this on the monitor and keyboard instead of through SSH unless you expect to be at the keyboard the whole time.
Configure MySQL
Here’s where I ran into another issue.
Theoretically you should be able to log directly into the MySQL server using a blank password.
systemctl restart mysql
mysql -uroot -p
For me this didn’t work and I didn’t know why. I did a bunch of troubleshooting, but eventually I was able to figure out that the source of the issue was with the authentication type being used. I won’t bore you with the details, but if you get an access denied error try the following.
First, stop MySQL and restart it without the usual protections.
sudo /etc/init.d/mysql stop
sudo mysqld_safe --skip-grant-tables &
mysql -uroot
Now that we can log in without the password check, navigate to the mysql database. Set a password (NOTE: change the password to something secure) and update the authentication type.
use mysql;
update user set authentication_string=PASSWORD("mynewpassword") where User='root';
UPDATE user SET plugin='mysql_native_password' WHERE User='root';
flush privileges;
quit
Now restart the MySQL server normally.
sudo /etc/init.d/mysql stop
sudo /etc/init.d/mysql start
You should now be able to log in normally as root with the password you just set and continue the configuration process.
mysql -uroot -p
Once in the server set up the LibreNMS database user, set the password, and set up the databse we’ll use in a bit.
CREATE DATABASE librenms CHARACTER SET utf8 COLLATE utf8_unicode_ci;
CREATE USER 'librenms'@'localhost' IDENTIFIED BY 'password';
GRANT ALL PRIVILEGES ON librenms.* TO 'librenms'@'localhost';
FLUSH PRIVILEGES;
exit
Set the server to use one file per table.
sudo nano /etc/mysql/mariadb.conf.d/50-server.cnf
Within the [mysqld] section make this change:
innodb_file_per_table=1
lower_case_table_names=0
Go ahead and restart the MySQL server.
systemctl restart mysql
Configure the Server
First thing to do is set the time zone manually in the php.ini file. Open the following files (sudo nano), find where it discusses time zones, and enter the appropriate time zone for your location.
- /etc/php/7.1/apache2/php.ini
- /etc/php/7.1/cli/php.ini
Now let’s make sure the server picks up on these changes and the right modules.
a2enmod php7.0a2dismod mpm_eventa2enmod mpm_preforkphpenmod mcrypt
Now let’s configure the server to use that /opt location for the directory. Open up the relevant file.
sudo nano /etc/apache2/sites-available/librenms.conf
Enter the following (substituting your hostname or domain name for the example domain):
<VirtualHost *:80>DocumentRoot /opt/librenms/html/ServerName librenms.example.com
AllowEncodedSlashes NoDecode<Directory "/opt/librenms/html/">Require all grantedAllowOverride AllOptions FollowSymLinks MultiViews</Directory></VirtualHost>
Now we tell Apache to use this new configuration file:
a2dissite 000-defaulta2ensite librenms.confa2enmod rewritesystemctl restart apache2
Configure SNMPD
We’d like to be able to monitor this server with SNMP as well. Copy the default configuration:
sudo cp /opt/librenms/snmpd.conf.example /etc/snmp/snmpd.confsudo nano /etc/snmp/snmpd.conf
In that file look for the existing community string of “RANDOMSTRINGGOESHERE” and put your own string there instead. Then download the agent and deploy it.
curl -o /usr/bin/distro https://raw.githubusercontent.com/librenms/librenms-agent/master/snmp/distrochmod +x /usr/bin/distrosystemctl restart snmpd
Configure Cron and Logrotate
The LibreNMS server uses cron jobs to run a lot of the alerting and monitoring functions, so you’ll need to pull the default cron profile into the cron folder.
sudo cp /opt/librenms/librenms.nonroot.cron /etc/cron.d/librenms
The logs will eventually get quite large and unwieldy, so you can use logrotate to keep them manageable.
cp /opt/librenms/misc/librenms.logrotate /etc/logrotate.d/librenms
Set Permissions
Run this:
chown -R librenms:librenms /opt/librenmssetfacl -d -m g::rwx /opt/librenms/rrd /opt/librenms/logs /opt/librenms/bootstrap/cache/ /opt/librenms/storage/setfacl -R -m g::rwx /opt/librenms/rrd /opt/librenms/logs /opt/librenms/bootstrap/cache/ /opt/librenms/storage/
Run the Web Installer
At this point you’re all set. Navigate to the URL or hostname where you configured the server to respond and follow the on-screen instructions. And enjoy!
Great guide but badly in need of updating. The Raspberry OS has been updated. PHP is a new version. A number of commands have changed. Paths have changed. I could not get much past the SQL install before the command and path changes shot me down. I am very much a noob so I could not get any farther. Thanks for your efforts though.
Great guide, but I am having same issues as Ken.
libapache2-mod-php7.0 is no longer available; using v7.1 causes an error when trying to run compose: Could not find package librenms/librenm with stability stable.
there is also no longer a need to update /etc/apt/sources.list
Stupid question, how does the librenms server know what the database password is? I set the password and permissions in the mysql section, but librenms can’t log in.
I get a bunch of these errors
[Warning] Access denied for user ‘librenms’@’localhost’ (using password: NO)